To use acne tools effectively, sterilize them first and apply gentle pressure around the pimple. Avoid using them on inflamed or deep cystic acne to prevent skin damage.
Acne tools, such as comedone extractors and lancets, are designed to help you manage breakouts safely and hygienically. They can be a valuable addition to your skincare routine, particularly if you’re prone to blackheads and whiteheads. By using these tools properly, you can minimize the risk of scarring and infection that often comes with improper pimple popping.
Remember, your skin’s health is paramount; therefore, knowing the correct techniques and ensuring cleanliness are essential steps. Before attempting any extractions, consult with a dermatologist if your acne is severe. With the right approach, acne tools can contribute to clearer skin and a more confident you.

Credit: www.amazon.com
Introduction To Acne Tools
Introduction to Acne Tools dives into the essentials of managing breakouts at home. Understanding the proper use of these tools can transform skin care routines. Acne tools, when used correctly, can aid in reducing blemishes safely and effectively. Let’s explore the types of tools available and how to incorporate them into your skincare regimen.
The Rise Of At-home Skincare
Recent years have seen a boom in DIY skincare. People now prefer to handle their skin concerns from the comfort of their homes. Acne tools play a big part in this trend. They offer a professional touch to everyday skin care. These tools include comedone extractors, acne patches, and microneedling devices, among others.
- Comedone Extractors: Remove blackheads and whiteheads.
- Acne Patches: Protect and heal pimples overnight.
- Microneedling Devices: Stimulate skin repair and reduce scarring.
Identifying Your Skin Type
Choosing the right acne tools starts with knowing your skin type. Each skin type responds differently to various tools. Understanding whether you have oily, dry, combination, or sensitive skin will guide you in selecting the appropriate tools.
| Skin Type | Characteristics | Recommended Tools |
|---|---|---|
| Oily | Shiny, prone to acne | Oil-absorbing patches, comedone extractors |
| Dry | Flaky, tight | Gentle exfoliation brushes |
| Combination | Mixed oily and dry areas | Varied tools based on area |
| Sensitive | Redness, irritation | Soft silicone brushes, hypoallergenic patches |
Types Of Acne Removal Tools
Exploring the different types of acne removal tools can be a game-changer for anyone battling with stubborn skin issues. From manual extractors to high-tech gadgets, there’s a tool for every type of acne concern. Let’s dive into some of the most effective tools available.
Comedone Extractors
Comedone extractors are simple, yet powerful tools for unclogging pores. They often have two ends:
- A looped end for pressing out blackheads.
- A pointed end for whiteheads.
Use gentle pressure to avoid skin damage. Always sanitize the tool before and after use.
Microneedling Devices
Microneedling devices create tiny punctures in the skin to promote healing. They can help with:
- Acne scars smoothing.
- Improving skin texture.
- Enhancing product absorption.
Choose devices with sterile, fine needles and follow instructions carefully.
Light Therapy Gadgets
Light therapy gadgets use different wavelengths of light to treat acne. Blue light targets bacteria, while red light reduces inflammation. These gadgets can:
| Benefit | Description |
|---|---|
| Reduce Breakouts | By killing acne-causing bacteria. |
| Minimize Scarring | By promoting healing and reducing redness. |
Consistent use is key for seeing results with light therapy.
Preparation For Acne Treatment
Getting ready to tackle acne means setting the stage for success. Preparation for Acne Treatment is crucial. It’s like prepping a canvas before painting. A clean, receptive surface allows for better treatment application and effectiveness. Here’s how to start the process right.
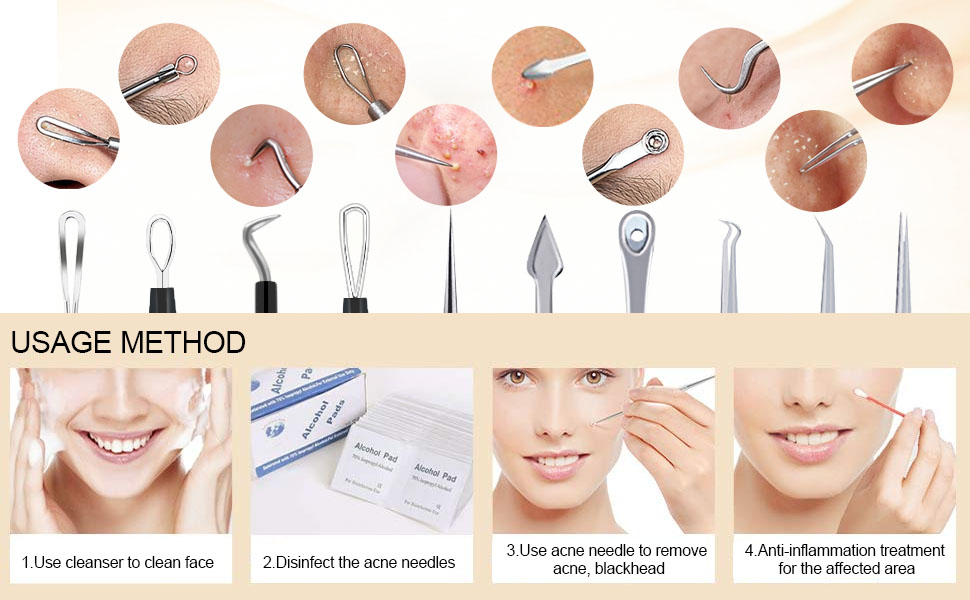
Cleansing Your Face Properly
Cleansing is step one in your acne-fighting routine. Begin with the right face wash. Choose one that suits your skin type. It should be gentle yet effective. Follow these easy steps:
- Wash hands to avoid spreading bacteria.
- Use lukewarm water to wet your face.
- Apply a small amount of cleanser to your fingertips.
- Gently massage the cleanser in a circular motion.
- Rinse thoroughly with lukewarm water.
- Pat your face dry with a clean towel.
Steaming For Open Pores
After cleansing, steaming is a fantastic way to open pores. This makes it easier to remove acne-causing agents. To steam your face at home, follow these simple steps:
- Boil water and pour it into a bowl.
- Let it cool slightly to avoid burns.
- Drape a towel over your head and the bowl.
- Stay under the towel for 5-10 minutes.
Remember, too much steam can irritate your skin. Keep it short and sweet.
Step-by-step Guide To Using Comedone Extractors
Comedone extractors are tools that help remove blackheads and whiteheads safely. These tools are very popular for keeping skin clean and clear. This guide will show you how to use them correctly and safely.
Sterilizing The Tool
Before using the comedone extractor, you must sterilize it. This is very important to prevent infection.
- Wash the tool with warm, soapy water.
- Rinse it under clean water.
- Dry it with a clean towel.
- Wipe the tool with an alcohol pad to kill germs.
Make sure the tool is completely dry before using it on your skin.
Gentle Extraction Technique
Using the comedone extractor properly is key to avoid hurting your skin.
- Start with a clean face. Wash your face with gentle soap.
- Steam your face or use a warm towel to open the pores. This makes extraction easier.
- Place the loop of the extractor over the blackhead or whitehead.
- Press down gently. If the blackhead or whitehead does not come out, do not force it.
- Clean the area with a mild antiseptic after extraction to prevent infection.
Remember, be gentle with your skin to avoid redness or scarring.
Microneedling For Acne Scars
Microneedling is a popular technique to treat acne scars. It uses tiny needles to prick the skin. This process helps your skin make more collagen. Collagen is a protein that makes skin smooth and firm.
Understanding Microneedling
Microneedling works well for reducing acne scars. The tiny needles create small wounds. These wounds heal and make the skin smoother. This method also helps skin care products work better.
- Improves skin texture: Makes skin smooth and reduces scar depth.
- Enhances product absorption: Opens up the skin for better product penetration.
- Stimulates collagen production: Boosts natural skin repair and firmness.
Safe Practices At Home
Using microneedling tools at home requires care. Follow these steps for safe and effective treatment:
- Clean your tool: Always start with a sterilized microneedler.
- Wash your face: Clean skin prevents infections.
- Use gentle pressure: Do not press too hard to avoid damage.
- Apply a soothing serum: Use a serum after treatment to calm the skin.
- Sanitize after use: Clean your tool after each use.
Remember, patience is key. Results appear gradually, not overnight. Keep your routine consistent for the best results.
Light Therapy Effectiveness
Acne tools with light therapy can work wonders on your skin. Light therapy targets acne-causing bacteria and may reduce inflammation. This treatment can help clear your complexion. Understanding the effectiveness of light therapy is key to using acne tools right.
Blue Light Vs. Red Light
Acne tools often use two types of light: blue and red. Each serves a different purpose.
- Blue light fights bacteria that cause acne.
- Red light helps reduce inflammation and can speed up healing.
Some devices combine both lights for a more powerful treatment.
Duration And Frequency Of Use
For best results, stick to the recommended duration and frequency. Follow these guidelines:
| Light Type | Duration per Session | Sessions per Week |
|---|---|---|
| Blue light | 5-10 minutes | 3-5 times |
| Red light | 5-10 minutes | 3-5 times |
Always use acne tools as directed. Overuse can harm your skin.
Post-acne Tool Skincare Routine
After using acne tools, skin needs special care. This routine helps to prevent infections and supports skin healing. A good Post-Acane Tool Skincare Routine is vital. It ensures your skin recovers well.
Applying Antiseptic
Keep your skin clean and infection-free after using acne tools. Apply a gentle antiseptic to the treated areas. This step is crucial. It wards off bacteria that can cause more acne.
- Choose a mild antiseptic to avoid irritation.
- Apply with a cotton pad, dabbing lightly on the skin.
- Avoid rubbing as it can aggravate the skin.
Moisturizing And Sun Protection
Skin needs moisture and protection, especially after treatment. Use a non-comedogenic moisturizer. It hydrates without clogging pores. Follow up with sunscreen of at least SPF 30. This shields skin from harmful UV rays.
| Step | Action |
|---|---|
| 1 | Apply moisturizer gently. |
| 2 | Use sunscreen every day. |
| 3 | Reapply sunscreen every 2 hours. |
Maintenance Of Acne Tools
Keeping your acne tools clean is a must for clear skin. Proper care prevents bacteria from spreading. Follow these steps to ensure your tools stay in the best shape.
Cleaning And Storage
Regular cleaning is crucial for acne tools. Here’s how to do it:
- Wash with soap and warm water after each use.
- Rinse thoroughly to remove any soap residue.
- Disinfect with rubbing alcohol by soaking for a few minutes.
- Air dry on a clean towel to prevent bacteria growth.
For storage, keep these tips in mind:
- Store tools in a dry, clean place.
- Use a separate container to avoid contamination.
- Ensure the storage area is cool and out of direct sunlight.
When To Replace
Acne tools don’t last forever. Look for these signs to know it’s time for new ones:
| Tool Type | Signs of Wear | Recommended Replacement Time |
|---|---|---|
| Comedone Extractor | Rusting or dullness | Every 6 months |
| Extraction Needles | Bent or blunt tips | After 3-4 uses |
Always inspect your tools before use. Replace them if they show any damage or wear. This keeps your skin safe and clean.
Tips For Preventing Acne Flare-ups
Clear skin starts with knowing how to prevent acne flare-ups. Your daily habits play a big role. Let’s explore some proven tips to keep your skin happy and healthy.
Diet And Lifestyle
Eat for clear skin. What you put in your body matters for your skin.
- Drink plenty of water to stay hydrated.
- Avoid sugary drinks and snacks.
- Focus on fresh fruits and vegetables. They help your skin.
- Limit dairy and high-glycemic foods. They can trigger acne.
Stay active with regular exercise. Sweat helps clear pores. Just remember to wash your face after.
Regular Skincare Habits
Consistency is key for skin care.
- Wash your face twice a day with a gentle cleanser.
- Use acne treatment products as directed.
- Never pop pimples. It can cause more acne.
- Exfoliate once a week to remove dead skin cells.
Choose non-comedogenic makeup and sunscreen. They won’t clog pores.
Remember to change your pillowcase often. It collects oil and dirt.
Credit: medrockpharmacy.com
Professional Treatments Vs. Home Tools
Dealing with acne can be tough, but knowing whether to use professional treatments or home tools is key. Each option has its benefits and limitations. Understanding these can help you choose the best method for your skin.
When To See A Dermatologist
You might need a dermatologist if:
- Your acne is severe or painful.
- Over-the-counter tools don’t work.
- You see deep scars or skin changes.
- Acne affects your daily life.
Dermatologists offer advanced solutions like:
| Treatment | Description | Effectiveness |
|---|---|---|
| Laser Therapy | Reduces oil and bacteria. | High |
| Chemical Peels | Removes dead skin cells. | Medium to High |
| Prescription Medications | Targets acne causes. | High |
Limitations Of Home Tools
Home tools are convenient but have limits:
- Lower Strength: They are less powerful than professional treatments.
- Slow Results: Improvements can take time.
- Risk of Misuse: Incorrect use can harm your skin.
- Limited Capabilities: They might not treat all acne types.
Popular home tools include:
- Acne patches
- Light therapy masks
- Topical creams with benzoyl peroxide or salicylic acid
Common Mistakes To Avoid
Exploring the proper use of acne tools is crucial. Knowing common mistakes to avoid is key to achieving clear, healthy skin.
Overuse Of Tools
Using acne tools too often can damage your skin. Here’s what you need to know:
- Do not use acne tools every day.
- Using tools excessively can cause redness and swelling.
- Limit use to once or twice a week, depending on your skin’s tolerance.
Ignoring Skin Irritation
Listen to your skin’s response after using acne tools:
- If you notice redness or pain, stop using the tool immediately.
- Consult a dermatologist if irritation continues.
- Choose tools that are appropriate for your skin type.
Always remember, gentle handling is crucial to avoid skin damage. Clean your tools before and after each use to prevent infection.
Conclusion: Your Journey To Clear Skin
Embarking on a clear skin journey involves tools and techniques. Acne tools play a vital role. They help in maintaining skin health. Yet, these tools alone won’t work miracles overnight. A blend of patience and consistent care is essential. This section will guide you to effectively use acne tools. Your dedication will pave the way for clearer skin.
Patience And Consistency
Patience is key when using acne tools. Your skin needs time to adapt. It also needs time to heal. Consistent use of acne tools can yield positive results. Remember to use these tools as per guidelines. Do not rush the process. A steady routine enhances skin texture and clarity.
Monitoring Skin Progress
Keep track of your skin’s progress. Use a journal or take regular photos. This helps you see improvements. It also helps identify what works best for your skin. Change your skincare routine based on these observations. Adjusting your approach ensures optimal use of acne tools.
Stay committed to your skincare regimen. Celebrate small victories on your path to clear skin. Remember, your journey is unique. Results will come with time and care.

Credit: www.wikihow.com
Frequently Asked Questions
Is It Ok To Use Pimple Popping Tools?
Yes, using pimple popping tools is acceptable if you follow proper hygiene, use sterilized equipment, and apply gentle pressure to avoid skin damage. Always cleanse your face and hands before and after use.
Do Acne Tools Leave Scars?
Acne tools can leave scars if used improperly or excessively. Gentle handling and following manufacturer instructions reduce this risk. Always prioritize skin health to avoid scarring.
What Do You Clean Pimple Popping Tools With?
Clean pimple popping tools with isopropyl alcohol before and after each use. Sterilize them by soaking for one minute to ensure hygiene. Rinse with water and dry thoroughly.
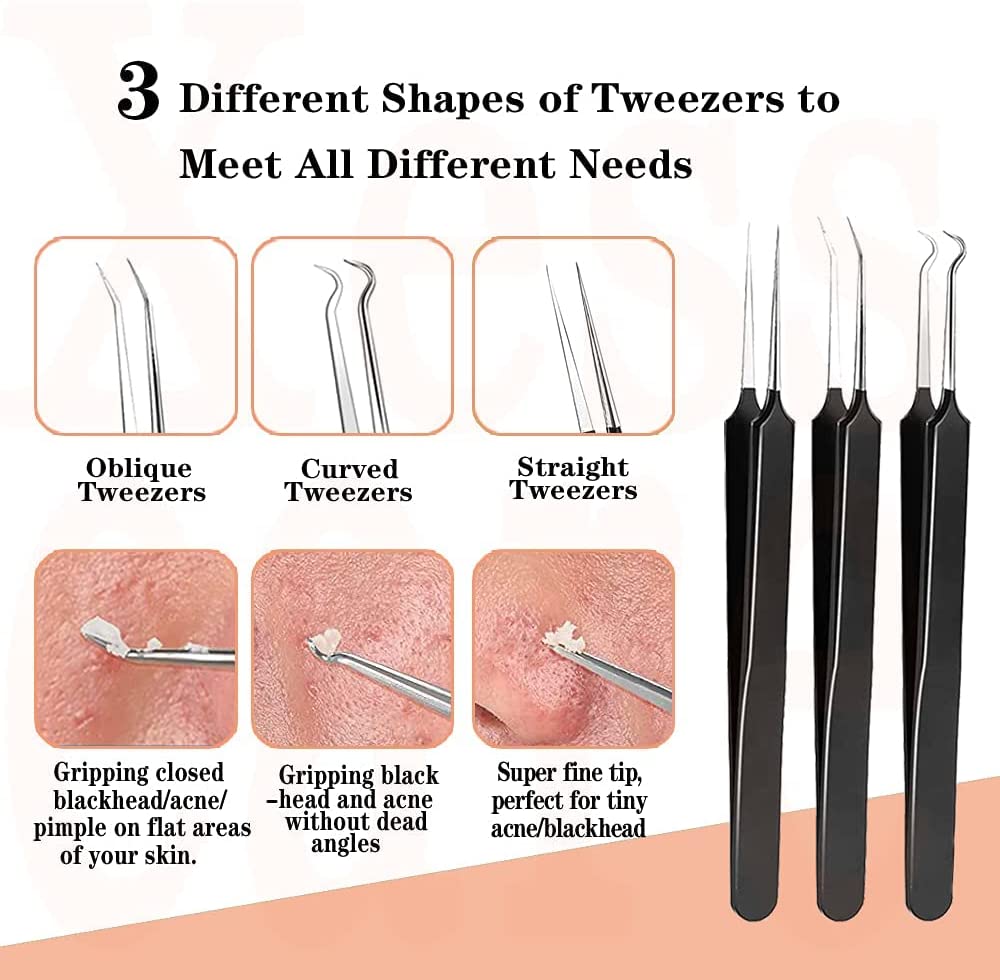
How Do You Use Acne Tweezers?
To use acne tweezers, first sterilize the tips with rubbing alcohol. Gently press the tweezers around the acne to extract pus. Avoid squeezing too hard. Cleanse the area afterward to prevent infection. Always use the tweezers on visible acne only.
Conclusion
Navigating the realm of acne tools can be transformative for your skincare routine. With proper use, these instruments can enhance your skin’s clarity and health. Remember to keep them clean and use them gently to prevent irritation. Embrace these tips and watch your skin thrive.
Ready for a clearer complexion? Start today!