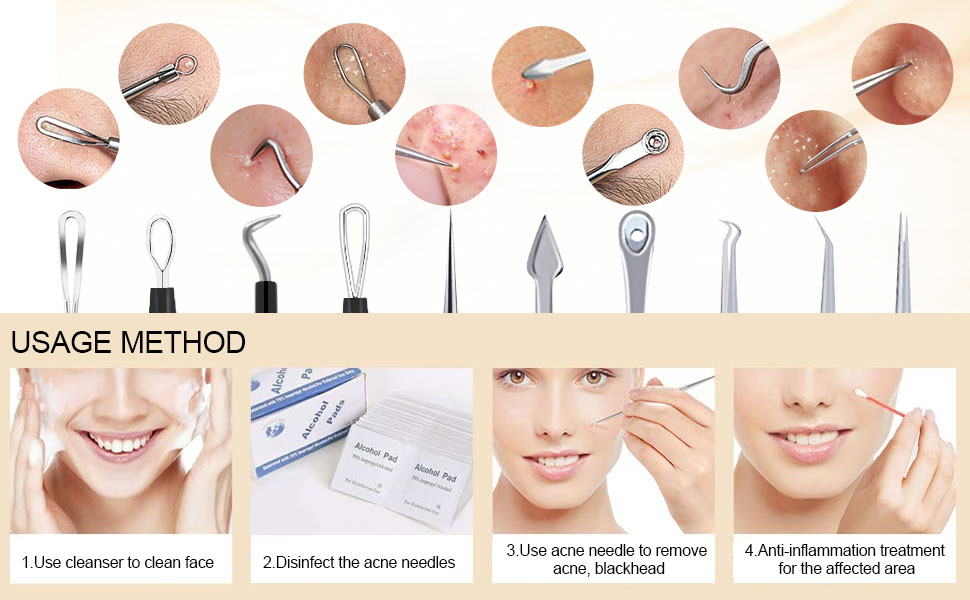
To use an acne tool correctly, start with clean skin and sterilize the tool before and after each use. Apply gentle pressure to extract pimples without causing damage to the skin.
Battling acne can be a frustrating experience, but with the right tools and techniques, managing breakouts becomes easier. An acne tool, also known as a comedone extractor, is a handy device designed to remove the core of a pimple safely.
Ensuring that your skin and the tool are properly sanitized is crucial to prevent the spread of bacteria that can lead to more breakouts. A proper acne tool has two ends: a sharp lancet for piercing whiteheads and a loop for pressing out blackheads. Users should be cautious not to overuse the tool or press too hard, as this can damage the skin and lead to scarring. Mastering the use of an acne tool can help keep your skin clear and reduce the risk of acne scarring. Remember, treating your skin with care is vital for maintaining its health and appearance.
Introduction To Acne Tools
Acne tools are essential for anyone battling skin breakouts. These specialized instruments help clear pores and reduce the risk of scarring. A clear understanding of how to use these tools can lead to a smoother, healthier complexion.
Types of Acne Removal ToolsTypes Of Acne Removal Tools
Several tools are available for acne treatment. Each serves a unique purpose:
- Comedone Extractors: Remove blackheads and whiteheads.
- Needle Extractors: Gently pierce and extract deep acne.
- Blackhead Tweezers: Grasp and remove stubborn blackheads.
- Suction Tools: Use vacuum action to cleanse pores.
Benefits Of Using The Right Tools
Properly using acne tools offers numerous benefits:
- Minimized Skin Damage: Reduces the risk of scarring.
- Enhanced Effectiveness: Targets problem areas effectively.
- Better Hygiene: Lowers the chance of infection.
- Fast Healing: Promotes quicker recovery of the skin.

Credit: www.exposedskincare.com
Identifying Your Skin Type
Before using any acne tool, it’s crucial to understand your skin type. Your skin is unique, and knowing its characteristics can make a huge difference in your skincare routine. Let’s dive into why it’s so important and how it impacts acne treatment.
The Importance Of Knowing Your Skin
Different skin types respond to treatments in varied ways. Identifying whether you have dry, oily, combination, or sensitive skin will guide you in choosing the right acne tools and products. It helps prevent irritation and ensures effectiveness.
Here are key reasons to know your skin type:
- Targeted care: Use products that suit your skin.
- Prevent damage: Avoid tools that may harm your skin.
- Better results: Enhance the effectiveness of your acne treatment.
How Skin Type Affects Acne Treatment
Your skin type directly influences which acne treatment works best for you. Each type has its challenges and preferred methods for using acne tools.
| Skin Type | Characteristics | Acne Tool Usage |
|---|---|---|
| Oily Skin | Shiny, prone to breakouts | Gentle exfoliation, oil-free products |
| Dry Skin | Flaky, tight feeling | Hydrating tools, minimal pressure |
| Combination Skin | Mixed oily and dry areas | Balanced approach, specific to zone |
| Sensitive Skin | Reacts easily, redness | Soft touch, hypoallergenic tools |
Remember, a proper diagnosis of your skin type is the first step to a clear complexion. Choose your acne tools wisely to keep your skin healthy and happy.
Before You Begin: Prepping Your Skin
Clear skin starts with proper preparation. Before tackling those pesky pimples with an acne tool, it’s vital to prep your skin correctly. This ensures a safe and effective treatment. Let’s dive into the essential steps for skin preparation.
Cleansing: The First Step
Begin with a clean canvas. Use a gentle cleanser to remove dirt, oil, and makeup from your face. This step minimizes the risk of infection when using an acne tool.
- Choose a mild cleanser suitable for your skin type.
- Use lukewarm water to help dissolve impurities without causing irritation.
- Pat your face dry with a clean towel.
Steaming: Opening Up Your Pores
Steaming is a crucial step. It opens up your pores, making it easier to remove blackheads and whiteheads.
- Fill a bowl with hot water.
- Lean over the bowl and cover your head with a towel.
- Steam for about 5-10 minutes.
This process should be comfortable and relaxing. If it’s too hot, take a break or move your face further from the steam.
Step-by-step Guide To Using Acne Tools
Clear skin begins with the right tools and techniques. This guide will show you how to use acne tools effectively and safely. Let’s dive into the specifics of each tool to ensure optimal results.
Proper Techniques For Comedone Extractors
Comedone extractors are great for removing blackheads and whiteheads. Follow these steps:
- Start with a clean face and tools. Use soap and warm water.
- Steam your face to open up the pores. Use a warm towel for about five minutes.
- Place the loop of the extractor over the comedone. Gently press down.
- Slowly apply pressure until the blockage is released.
- Clean the area with an antiseptic wipe to prevent infection.
- Wash the tool with soap and water after each use.
Best Practices For Using Acne Needles
Acne needles, or lancets, are used for puncturing whiteheads. Here’s how to use them safely:
- Clean your face and the needle with alcohol.
- Gently puncture the whitehead with the needle.
- Use a comedone extractor to remove the pus.
- Disinfect the area with an antiseptic.
- Wash the needle with alcohol before storing.
Remember, gentle handling is crucial to avoid skin damage and scars.
Using these tools correctly can lead to clearer skin. Always be gentle and keep everything clean!
Hygiene And Maintenance Of Acne Tools
Maintaining clean acne tools is crucial for effective skin care. Proper hygiene prevents skin infections and promotes healing. Let’s dive into how to keep your tools in pristine condition.
Cleaning Your Tools After Use
Cleaning your acne tools right after using them is essential. Here’s a simple step-by-step guide to ensure your tools are spotless:
- Wash your hands with soap and water.
- Rinse the tool under hot water to remove debris.
- Use a disinfectant, like isopropyl alcohol, to wipe down the tool.
- Rinse again with hot water.
- Dry the tool with a clean, lint-free cloth.
Storing Your Tools Safely
After cleaning, safe storage is key to keeping your tools ready for next use:
- Ensure tools are completely dry.
- Place each tool in a separate, clean compartment.
- Store tools in a dry, cool place.
Remember, a clean and dry environment stops bacteria from growing.
Following these steps will help keep your acne tools in top condition and your skin healthy.
Post-extraction Skin Care
After using an acne tool, skin care becomes crucial. It helps heal your skin. This guide covers the steps you should take for post-extraction skin care. Follow these tips to ensure your skin recovers properly.
Soothing Your Skin
Calming your skin after extraction is key. Use gentle motions. Avoid rubbing the area too hard. Here’s how to soothe your skin:
- Cleanse gently with lukewarm water.
- Pat the area dry with a clean towel.
- Apply a cool compress to reduce swelling.
- Use products with aloe vera or witch hazel.
Applying The Right Products For Recovery
Post-extraction, your skin needs healing products. Choose items that support skin repair. Here’s what to use:
- Antibacterial creams prevent infection.
- Salicylic acid keeps pores clear.
- Hydrating serums with hyaluronic acid boost moisture.
- Sunscreen protects your sensitive skin.
Remember to apply these products with clean hands. Give your skin time to absorb them.
Common Mistakes To Avoid
Navigating the world of acne tools requires careful steps to maintain healthy skin. A clear understanding of common mistakes to avoid is crucial. Jumping into the process without proper knowledge can lead to more harm than good. To ensure effective and safe use, let’s address these critical errors.
Over-extraction And Skin Damage
Over-extraction is a frequent misstep that can worsen skin conditions. Using acne tools too aggressively invites unnecessary risks. Below are key points to keep in mind:
- Apply gentle pressure to avoid skin trauma.
- Limit tool use to obvious blemishes.
- Stop if the blemish does not clear with minimal effort.
Ignoring these steps can lead to long-lasting skin damage, including scars and infection.
Cross-contamination Concerns
Keeping your acne tools sterile is essential. Without proper sanitation, tools can harbor bacteria, leading to cross-contamination.
- Disinfect tools before and after each use.
- Never share your tools with others.
- Store tools in a clean, dry place.
Adhering to these practices ensures your skin remains safe from unwanted breakouts caused by bacteria.

Credit: www.wikihow.com
Professional Treatments Vs. At-home Tools
Managing acne can feel like a balancing act. On one side, professional dermatological treatments offer expertise and potent remedies. On the other, at-home tools promise convenience and control. This section dives into when it’s best to seek professional help and the benefits and limits of home tools.
When To See A Dermatologist
Chronic acne or severe breakouts need a dermatologist’s touch. If over-the-counter tools fail, or if acne causes deep scars or emotional distress, professional guidance is key. Dermatologists can offer treatments like:
- Prescription medications that target acne causes
- Laser therapy to reduce scars and inflammation
- Chemical peels that rejuvenate the skin surface
Limitations Of Home Tools
While at-home acne tools offer a DIY approach, they come with limitations. Home tools may not penetrate deeply enough to tackle the root of severe acne. They also require consistent and correct use to avoid skin damage. Consider these limitations:
| Tool Type | Limitation |
|---|---|
| Extraction tools | Risk of scarring and infection if misused |
| At-home light therapy | Less powerful than professional devices |
| Topical treatments | May not address underlying issues |
Expert assessment ensures the right treatment plan. Choose home tools for mild cases and maintenance, but seek professional help for more serious conditions.
Advanced Tips For Clear Skin
Seeking a radiant complexion involves more than just topical treatments. The ‘Advanced Tips for Clear Skin’ delve into the holistic approach to acne management. By understanding the impact of diet, lifestyle, and routine skin evaluations, achieving that sought-after clear skin becomes a tangible reality. Let’s explore these dimensions with practical advice that can elevate your skincare regimen.
Diet And Lifestyle Adjustments
Nutrition plays a pivotal role in skin health. A balanced diet rich in vitamins and minerals supports skin repair and maintenance. Below are key dietary changes for clearer skin:
- Increase water intake to flush out toxins.
- Consume antioxidant-rich foods like berries and leafy greens.
- Limit dairy and high-glycemic foods which can trigger acne.
Lifestyle tweaks are equally crucial:
- Ensure adequate sleep for skin rejuvenation.
- Manage stress levels through meditation or exercise.
- Avoid touching your face to reduce bacteria transfer.
Incorporating Routine Skin Checks
Regular monitoring of your skin can prevent acne flare-ups. Use a magnifying mirror to spot early signs of blemishes. Here’s how to conduct effective skin checks:
| Frequency | Action |
|---|---|
| Daily | Examine for new spots or irritation. |
| Weekly | Clean makeup brushes to remove bacteria. |
| Monthly | Check for changes in mole size or color. |
Record your observations in a skin diary. This practice can reveal patterns and triggers unique to your skin. It can also inform your dermatologist for personalized advice.

Credit: www.wikihow.com
Conclusion: Embracing Your Journey
Using an acne tool properly marks a new chapter in your skincare routine. It’s a journey towards clearer skin, but it requires dedication and the right approach. Let’s explore key strategies to maximize your results and truly embrace the process of improving your skin’s health.
Patience And Consistency
Patience is crucial when using an acne tool. Skin improvement takes time. Consistent use is equally important. Here’s why:
- Time Allows Healing: Your skin needs time to heal after each use of the acne tool.
- Regular Use: Consistency helps maintain clear pores and prevent future breakouts.
Mark your calendar for regular tool use, sticking to a schedule that works for you.
Celebrating Clear Skin Milestones
Celebrate every step forward in your skincare journey. Recognizing improvements can motivate you to continue. Here are some milestones to celebrate:
- First Week: Completing your first week of consistent tool use.
- Noticeable Improvement: When your skin starts to clear up.
- Less Frequent Breakouts: Experiencing fewer breakouts than before.
Keep a photo diary to visually track your progress. This can boost your morale on tough days.
Remember, each small step is a part of your larger journey to healthier skin. Embrace each phase with confidence and care.
Frequently Asked Questions
How To Use A Pimple Popper Correctly?
To use a pimple popper correctly, first cleanse your skin and the tool. Gently press the loop over the pimple, then slowly apply pressure. Wipe away the extracted material with a sterile pad. Disinfect the area and the tool post-use to prevent infection.
Is It Okay To Pop Pimples With A Tool?
Popping pimples with a tool is not recommended unless performed by a healthcare professional. Improper use can lead to infection, scarring, and worsened skin conditions. Always consult a dermatologist before attempting any acne extraction.
Do Acne Tools Leave Scars?
Acne tools can leave scars if used improperly or excessively. Proper technique and sterilization minimize this risk. Consult a dermatologist for safe usage recommendations.
How To Remove A Blackhead That Won’t Come Out?
Start by applying a warm compress to open up the pores. Gently use a blackhead removal tool, but avoid force. If it persists, apply a salicylic acid treatment to help dissolve the blockage. Consult a dermatologist for stubborn blackheads.
Conclusion
Mastering the art of using an acne tool can transform your skincare routine. Remember, gentle pressure and a sterile environment are key. By following the steps outlined, you’re setting the stage for clearer, healthier skin. Keep consistency in practice, and you’ll see the benefits of proper technique in no time.
Embrace your journey to a blemish-free complexion with confidence.